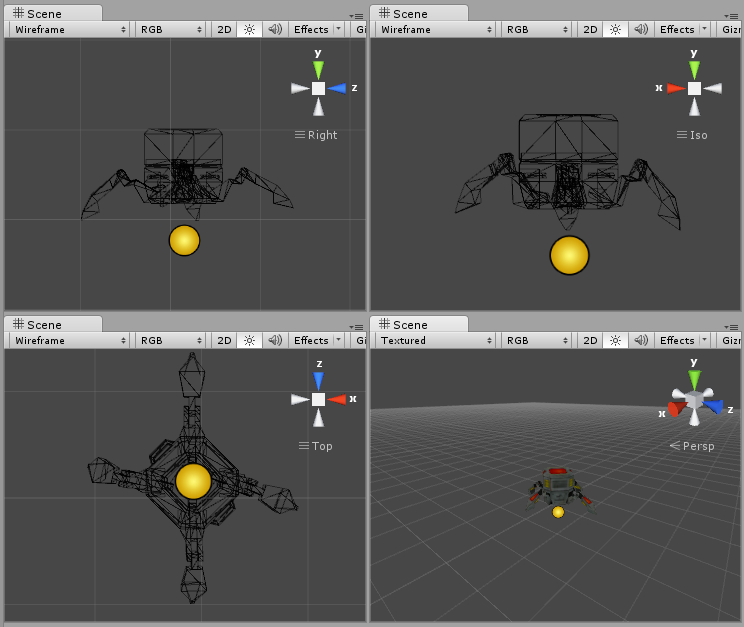
Energy Bar Toolkit bars have the ability to follow any 3D object on your scene. It is very useful for games where you have characters with health status that should be displayed right above or beyound them (like for strategy games).
General approach
To make your bar be displayed below or above it’s recommended to create an empty game object child under the 3D model object that you want to follow.
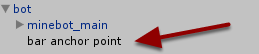
In this way you have a full control where in 3D space your bar should be displayed.
Unity UI (uGUI) way
Anchoring with Unity UI is very simple. Just follow these steps:
- Select the bar object that you want to be a follower
- From the main menu select Tools → Energy Bar Toolkit → uGUI → Add Components → Follow Object
- In your bar inspector edit Energy Bar Follow Object component and:
- Set the Follow Object field to the object or anchor that you want to follow
- Set the camera that is used to render that object (usually it will be the Main Camera)
- Optionally set the Offset
Spawning objects with bars attached
The common use case is to spawn objects during gameplay that should have the bar attached. There’s a little issue with this approach. You have to make sure to:
- Instantiate your 3D object
- Instantiate your bar under Canvas object
- Change Follow Object settings to follow the newly created object
- Save this association somewhere, so when you will destroy the 3D object, the bar will be destroyed too
Normally this would require programming skills, but Energy Bar Toolkit from version 3.0.3 introduces new Spawner component that will help you to setup this kind of scenario without pain!
It’s really simple. Just follow these steps:
- Create a new bar prefab that should follow your 3D object
- Select your 3D object (prefab) that you want your bar to follow
- From the main menu choose Tools → Energy Bar Toolkit → uGUI → Add Components → Spawner
There are some things that you need to set here:
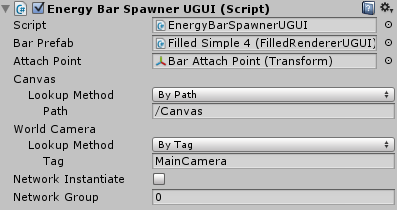
- Bar Prefab – The bar prefab created in step one
- Attach Point – This should be the current object or if you created a special empty game object that your bar should be attached to (it should be under the current object in the hierarchy) then set it here
- Canvas – Canvas lookup settings. Read below how lookups are working.
- World Camera – World camera lookup settings. This should be set to the camera that will render this 3D object. Read below how lookups are working.
- Network Instantiate – Enable this if this object should use Network.Instantiate instead of Object.Instantiate
- Network Group – Network Group when using Network Instantiate
Attaching this script will make sure that:
- On instantiate the bar will be instantiated under given Canvas object and will use World Camera to compute the 3D object screen position.
- On destroy the bar will be destroyed along with 3D object.
Lookup methods

Lookup methods is a way to find an object on the scene. If you’re instantiating a prefab then making a direct reference may not always work, so using a lookup is a most efficient way to find your object.
Lookup method – By Path
This method takes a Path as an argument. Use it if you know that your object will be always called the same and set at the same position. Examples:
- /Canvas – Canvas is always created on top of hierarchy
- /Main Camera – Standard name and position for the default camera
Pros:
- You don’t need to set anything more
Cons:
- If your object name or hierarchy path changes, the lookup will fail
Lookup method – By Tag
This method takes a Tag as an argument. It will use first object with used tag into the account. It’s really good for MainCamera because the main Unity3D camera must have this tag to be set.
Pros:
- Your object may be anywhere in the hierarchy with any name
Cons:
- You have to remember to set the tag to only one object per scene
- Canvas does not have the tag set at default
Lookup method – By Type
It just searches for the first object of desired type (you don’t need to set anything). If you have only one canvas and one camera, this is the simplest and safest method.
Pros:
- The simplest and safest until you have only one object per scene of given type
Cons:
- The slowest of all lookup methods.
Lookup method – By Reference
Takes a object reference. It may be used if your whole scene is a prefab.
Pros:
- Standard Unity3D way to reference another object
Cons:
- When instantiating a prefab the reference can be lost in many scenarios
Accessing spawned bar instance
When your new bar is spawned along with the object, you will need to access its instance. To do that you have to access EnergyBarSpawnerUGUI component from your code. If your script is attached to the same game object as EnergyBarSpawnerUGUI component, the code may look like following:
var spawner = GetComponent<EnergyBarSpawnerUGUI>();
var barRenderer = spawner.instance; // bar renderer allows to access rendering properties
var bar = barRenderer.GetComponent<EnergyBar>(); // allows to change bar value

// bar.ValueF = 1.0f; - will fill the bar to maximum value
Mesh way
There are two approaches for anchoring Mesh renderers.
Anchor object approach
Creating an anchor for mesh bars is widely described for at mesh renderers documentation pages. Please click here to go directly to the anchoring documentation.
Pros
- Good for 2D → 3D anchoring. Bars will stay in 2D space, but will follow 3D objects position.
Cons
- Difficult to instantiate objects with anchored bars
Outside panel approach
This approach has been introduced in Energy Bar Toolkit 2.0.0. You can freely move your bar objects away from the panel and put it under any game object on your screen.
Here’s the video of this feature:
Facing the camera or other objects
If you’re using outside-panel approach your bars may be faced to different direction that your camera is. You can make them always face the camera by using Look At option in Position & Size section of your bars.
OnGUI way
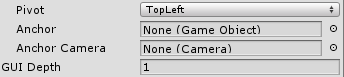
Anchor is nothing more and nothing less than a GameObject to which energy bar will stick. Anchor property can be found in Position & Size section of your energy bar inspector.
Setting an Anchor will set your pivot point of bar coordinate system at anchor screen position. Quite simply, this means that 0,0 will be always exactly on the object that you are anchoring to.
Additionally, next to Anchor property in your inspector, you have Anchor Camera which is the camera on which anchored object is rendered. It’s important when you’re using more than one camera because object may appear on different places on different cameras, or not appear at all.
Examples (with source code)
 |
| Launch |