This tutorial will describe how easy it is to place new energy bar into the Scene using Unity OnGUI renderer. For NGUI tutorial please look at NGUI Integration Tutorial.
Workflow
Workflow for creating new progress bars has two possible ways.
The first one is to choose renderers from Tools → Energy Bar Toolkit → Create OnGUI Bar → Filled/Repeat/Sequence/Transform Renderer:

This method creates GameObject with renderer script attached and ready to work with.
The second way is to drag renderer script to existing GameObject or its Inspector.
You can find those scripts here:
Assets/Energy Bar Toolkit/Scripts/“Renderer script”
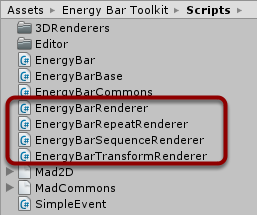
- EnergyBarRenderer – default (filled) renderer
- EnergyBarRepeatRenderer – for repeated icons
- EnergyBarSequenceRenderer – for sequences of images
- EnergyBarTransformRenderer – for bars that one of their elements needs to be transformed
Workflow Steps
- a) Create GameObject with renderer script attached using Tools→Energy Bar Tollkit→Create OnGUI Bar→*"Renderer"*
or- b) Create new GameObject (CTRL + SHIFT + N) on your Scene and attach renderer script to this object by draging it from Project view:
Asstes→Energy Bar Toolkit→Scripts→“Renderer script”
on its name or its Inspector.
- b) Create new GameObject (CTRL + SHIFT + N) on your Scene and attach renderer script to this object by draging it from Project view:
- Configure your bar appearance and behavior in the script inspector
And that’s it! You’re done with basic workflow!
But wait! Why I don’t see a thing?!
This is because you need textures to be able to display something. Normally you would prepare these textures in Photoshop or GIMP following Graphics Guidelines while creating them, but you don’t need to do it right now. You can make use of provided bar graphics and prefabs available at Energy Bar Toolkit/Example/Textures and Energy Bar Toolkit/Example/Prefabs.
Your First Energy Bar
Example Scenes may be a good start to check how things may and should work, but now we will go step by step with setup of our first energy bar. In this case it’ll be the Filled Bar. Please follow these steps:
First of all – create new renderer choosing from Tools→Energy Bar Toolkit→Create OnGUI Bar→ Fill Renderer and name it “myFirstBar”
You should see something similar to this in the Inspector view:
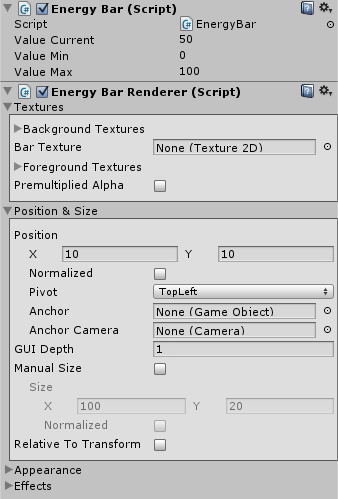
(I’ve hidden Appearance and Effects for now)
What interest you the most for the moment are the properties of Energy Bar (Script) like Value Current, Value Min, Value Max, then Background Texture, Bar Texture and Foreground Texture.
Values are integers. These allow you to freely setup from-to value. For instance if your game hero health consists of 3 hearts, and there is a possibility to have half of a heart (let’s say that damage doesn’t take whole heart but one half) then you probably want to set Value Min to 0 and Value Max to 6. Value Current is something that you can set to be initial value, but it’s easily accessible from script by int valueCurrent field or float ValueF property. You can find more information about it by looking at Scripting section.
Attaching Textures
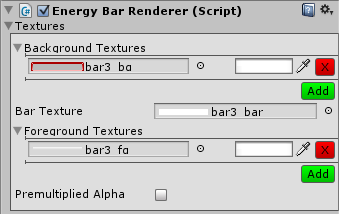
You can create your own textures using Graphics Guidelines, but now we will focus on something that is already provided in the package. Please choose texture for each texture field and search for bar3_ textures. There will be duplicated entries, so make sure to choose textures from Energy Bar Toolkit/Example/Textures/Bar3 directory.
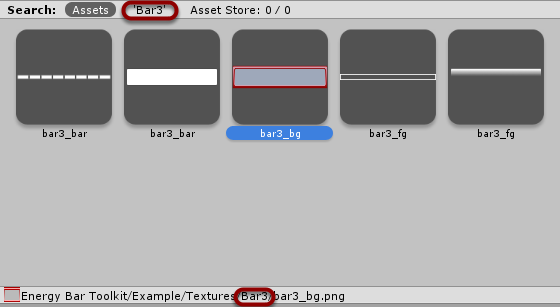
- For Background Texture choose bar3_bg
- For Bar Texture choose bar3_bar
- For Foreground Texture choose bar3_fg
After dragging the textures you may see warning similar to this:
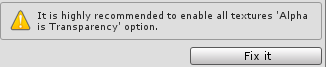
Don’t worry! In most cases you only need to press the Fix it button. Please remember, that when something is not displaying correctly on your screen, there may be some warnings visible in the Inspector.
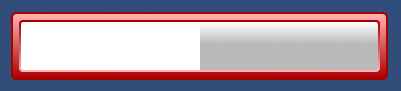
As a result your Inspector should look like this:
And (surprise!) in your Game View you should be able to see your bar!
Changing Appearance
Let’s now take a look at the Appearance section in the Inspector.
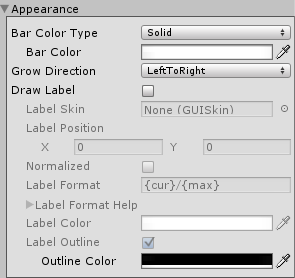
There are some settings that are more advanced and it’s not a topic of this tutorial, but please take a look at color settings at the top. If you’re following Graphics Guidelines you should know that in most cases your graphics should be colored in greyscale so you can colorize it later using these fields.
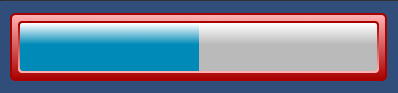
Let’s try to change bar color just for fun by setting Bar Color to this:

Our bar appearance will change immediately:
Conclusion
And this concludes basics tutorial. Your first progress bar is ready, now you have to experiment with different configurations by yourself. Please take a look at the other sections of this documentation, to get familiar with all Energy Bar Toolkit functions.